
Using Standard Filters
In both Contacts and Companies Hubs, we have the same common filters available.
The "All contacts" view is the standard view that show all Contacts you have access to.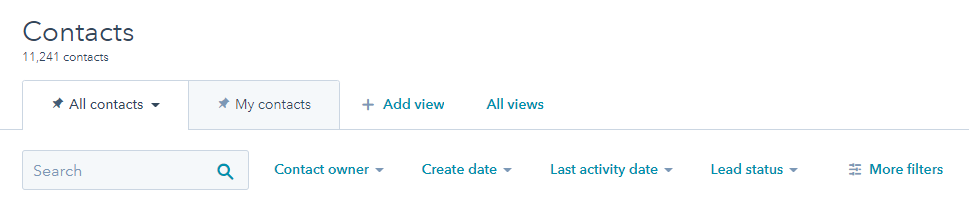
Select Contact owner to filter by the Contact Owner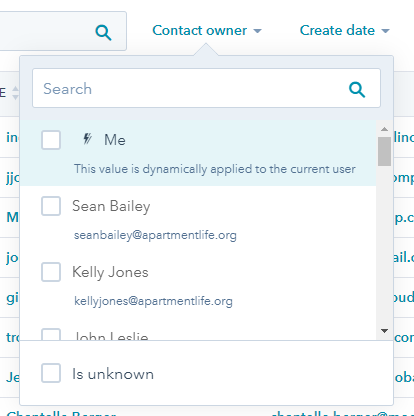
NOTE: We recommend that you pin the Standard View "My contacts" for easy reference. See below.
You can also use the standard filters for Create date, Last activity date and Lead status.
More Filters
If you need to apply more filtering, use the "More filters" and you can slice and dice the list any way you want! You can choose any Contact property you want.
Here are a few helpful properties you might want to include in filters.
- Metro-Contact
- Client Relations Rep Full Name
- Client Relations Rep Email
- Recruiting Rep Full Name
- Recruiting Rep Email
- Regional Leader Rep Full Name
- Regional Leader Rep Email
- Customer Status
NOTE: If you create a Filtered list of Contacts that you really like, make sure you Save it as a View!
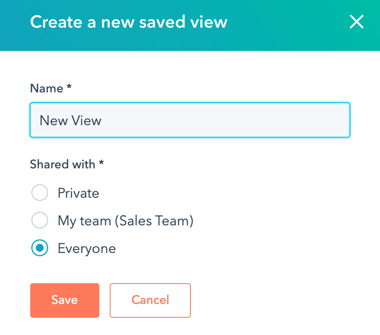
Create a saved view
- In your HubSpot account, navigate to your contacts, companies, deals, or tickets.
- For your deals or tickets home, ensure you're in the table format. If you're in the board format, click the listView table icon in the upper left.
- Next to the existing tabs, click Add view. In the dropdown menu, click Create new view.

- In the dialog box, enter a name for your view and select the users to share the view with. Once you finish setting up the view, click Save. You'll be brought to the new view.
- The newly created view will have the criteria you've selected earlier. You can continue to set new criteria for your new view:
- Click the default property dropdown menus above the table and select the values that you want to filter the records by.
- For other properties, click More filters and in the right panel, search for and select the property, then specify the criteria. Learn how to set up your filter.
- To ensure the filters are saved, in the upper right, click Save view and select Save. You can select Reset instead if you want the view to return to its original saved version, removing any filters you've applied to it.
If you've already filtered the contacts in the All [objects] tab, you can save it as a new view as well by clicking Save view in the upper right and selecting Save as new. In the dialog box, enter the name of the view, customize the users you will share the view with, and click Save.
Access and edit a saved view
- In your HubSpot account, navigate to your contacts, companies, deals, or tickets.
- In the table format, you can access a saved view in the following ways:
- When available, click the tab of the view.
- Click Add view and select the saved view.
- Click All views and click the saved view.
- In the board format for your deals and tickets homes, to access a saved view, click the second dropdown menu in the upper left and select a saved view.

- In the view, you can edit the criteria:
- Click the default property dropdown menus above the table and select the values that you want the records to have.
- For other properties, click More filters and in the right panel, search for and click the property, then specify the criteria. Learn how to set up your filter.
- In the upper right, you can click Save view to update the view's filters. In future, this view will have the updated filters you've set.
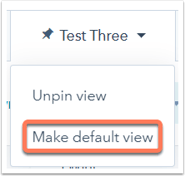
Pin your saved view as a tab and make it appear by default
To ensure that a saved view will always be accessible in a tab, you need to pin it.
- In your HubSpot account, navigate to your contacts, companies, deals, or tickets.
- For your deals or tickets home, ensure you're in the table format. If you're in the board format, click the listView table icon in the upper left.
- Click Add view and select the view you want to pin.
- In the view, click the tab again and select Pin view to keep open.

- Once pinned, you can make the saved view the default view (i.e., when you enter your records home, you will access the default view). Click the tab and select Make default view.
Manage existing views
- In your HubSpot account, navigate to your contacts, companies, deals, or tickets.
- For your deals or tickets home, ensure you're in the table format. If you're in the board format, click the listView table icon in the upper left.
- Next to the tabs, click All views. You can see your saved views, which includes:
- Standard views provided by HubSpot;
- Views you've created; and
- Views others have shared with you.
- To edit an existing view, hover over the view and click the Options. dropdown menu and select one of the following:
- Create report: select to create a custom single object report using the set of filters. This is only available for Professional and Enterprise subscriptions, and Reporting add-on users.
- Clone: select to clone this view. In the dialog box, enter the clone view's name and click Save.
- Delete: select to delete the view. In the dialog box, click Delete.
- Export: select to export the records in the view.
- In the dialog box, click the File format dropdown menu to select the format for your export file.
- Select either to Include only properties in the columns or to Include all properties.
- Click Export and an email with a link should be delivered to your email inbox once it is processed.
- Manage sharing: select to change the users who can see the view.
- In the dialog box, select Private to keep the view private to your user, My team to share it with users in your HubSpot team, or Everyone to share it with all users in the HubSpot account.
- Click Save.
- Rename: select to change the view's name. In the dialog box, enter the new name and click Save.
More Information:
Create, customize, and manage your saved views